This is for the LBT animated series project... I think this is the right section for it
 Introduction.
Ok! Animation! I will try to organize this to the best of my ability, but forgive me if things get a little jumbled

If you find you are having trouble grasping a concept, please feel free to ask questions. There are also many wonderful animation references on the internet, as well as many wonderful books on the subject. I am mostly doing this from memory
Before I begin I would like to raise one more point. The most importaint thing is to observe motion, make decisions based on your observations, and keep practicing

While these are guidelines based on the ways that traditional animation has evolved in western studios, they are by no means the only way of doing things. As a professor of mine always said, the only reason we learn the rules is so that we can intelligently break them
I am by no means a professional, and I am still learning too. So here goes! I hope someone learns something from my nonsense
 Wink")
There are many different tools you can use for 2-D animation. A good freeware program to start out with is Pencil, which I have used before:
http://www.pencil-animation.org/You can also do it with pencil and paper, if you have a lightbox (or some way to light the paper from behind) and a scanner.
I will be using Flash MX for this tutorial.
As we all know, the basis of traditional animation is making a lot of drawings of the same thing with slight changes

But how do you decide how many drawings you should make? How do you keep from losing track of things? How do you keep the character looking the same in each drawing? Well, we will examine all of these questions in detail
The goal of animation, or at least the kind that we are doing, is to achieve the illusion of lifelike motion through the changing of shapes over time. It is important to remember this, and not overcomplicate things for yourself too early in the process.
How do I decide how many drawings I should make?Well, that requires a bit of explanation.
There are two core principles in animation. They are called 'Timing' and 'Spacing.'
The timing of an action is literally how much time it takes to complete the action, start to finish. There are several ways to figure this out. You can record yourself performing the action, or search for videos online of that action being performed. You can get a stopwatch or other form of timer and time yourself doing it. You can get a friend to do it, and time them. Also, a bit less accurate, but it works in a pinch, you can visualize the action in your head, and time that (I don't have a stopwatch, so I use online-stopwatch.com
). Once you figure out the timing of the whole action, you can break it down into smaller pieces. For exaple, let's say your action is a yawn and a stretch. Once you time the whole action, you can time the yawn, and time the stretch separately. These may overlap, but knowing the timing of each can help you keep things smooth. And you can always adjust your timing by adding and removing drawings if things don't look right.
Once you know your timing, you figure out the number of drawings that you will need to fill that time by deciding on your 'frame rate.' Your frame rate is simply how many drawings will appear on the screen for every second of animation. There is no required frame rate, you can use any one you want, but the standard used by large studios such as Disney is 24 frames per second. This means that you have to make 24 drawings to make one second of animation.
This takes a lot of time and energy though, and making that many drawings isn't always necessary to make a good animation. Many times those studios will switch to 12 drawings per second. They call this putting an animation "on twos," because, while the frame rate actually stays at 24 frames per second, they let each drawing take up two frames. That way they only have to draw half as much, and if they reach a point where they need more detail, they can easily switch back to the full 24 drawings per second.
So that's timing! Now, we're on to spacing. Spacing is a bit more complicated. Spacing refers to how far apart your drawings are from one another. Two animations with the same timing can look very different if the spacing is changed. To demonstrate this, I will use the 'bouncing ball,' which has been done many times before.


Though these all take exactly the same amount of time, changing the spacing changes the type of motion taking place.
Things can get kind of complicated, but the main thing to remember is that spacing and timing work together to determine the time and speed that a movement takes. The closer together your drawings are, the slower they will appear to be moving, and the farther apart, the faster the motion will appear.
For example, take these two spacings of a simple arm movement:
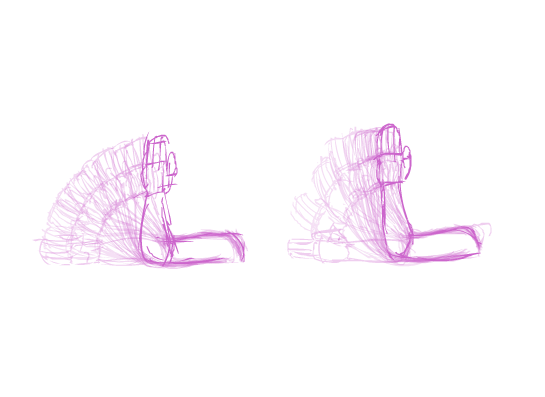
Each drawing of the arm represents a different frame.
There are the same number of frames in each, so they both take up the same amount of time, but the first arm will appear to be moving at the same speed the whole time, while the second arm will appear to be moving faster at the beginning, and slower at the end.
This is an exaple with fairly subtle differences. The more dramatically you change your spacing, the greater the difference you will see between animations.
Good spacing may be difficult to get the hang of at first, but the more you practice, the more you will come to understand it.
How do I keep from losing track of things?With so many drawings that go into an animation, it can be easy to lose your place and get overlaping actions and timing in general confused.
There are a lot of things you can do to help with this. One of these is to draw keyframes. Keyframes are the most important drawings in an animation. They are the drawings that define the action that a character is taking.
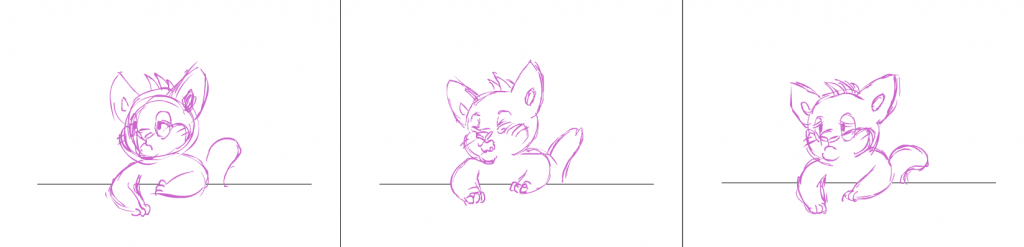
Think about what your character is doing- let's say you are animating a character yawning. Now that you have decided on the action, you have to decide what the most important poses will be, the ones that will make the action unmistakable. There are many different ways to keyframe any given action, but we will keep it simple in this example. We will say that there are three key poses: before the yawn, the peak of the yawn, and after the yawn. Drawn out, they might look something like this:
Okay, so we have the keyframes. Once we get our timing, we can place each keyframe at its appropriate frame number (or you can do this in the opposite order, and figure out your timing and keyframe numbers before you draw your keyframes). Let's say we timed it out, and figured that the whole action will take about 1.4 seconds (When I do timing for a stand alone action, i try to include short pauses with the character before and after so it does not look too rushed). To figure out how many frames your animation is going to have, just take the number of seconds and multiply it by the frame rate. In this example, we will use 24 fps. 1.4 x 24 = 33.6. We obviously cannot have 6/10ths of a frame. Whenever I am left with a decimal for frame number, I round the number up or down depending on the circumstance and what the frames are being used for, but you are free to deal with it however you like. So my final number is 34. I now know that the finished animation will have 34 drawings.
Now we break it down further, and decide that the character will reach the peak of the yawn .6 seconds after the start of the animation. .6 x 24 = 14.4. So we will say that the character will reach the peak of the yawn at frame 15.
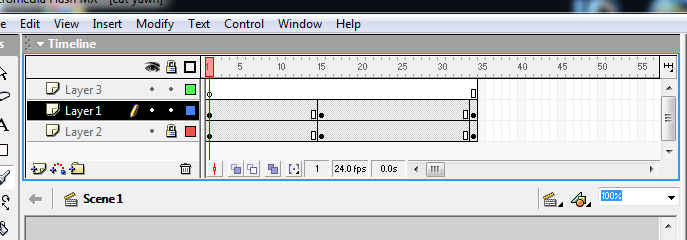
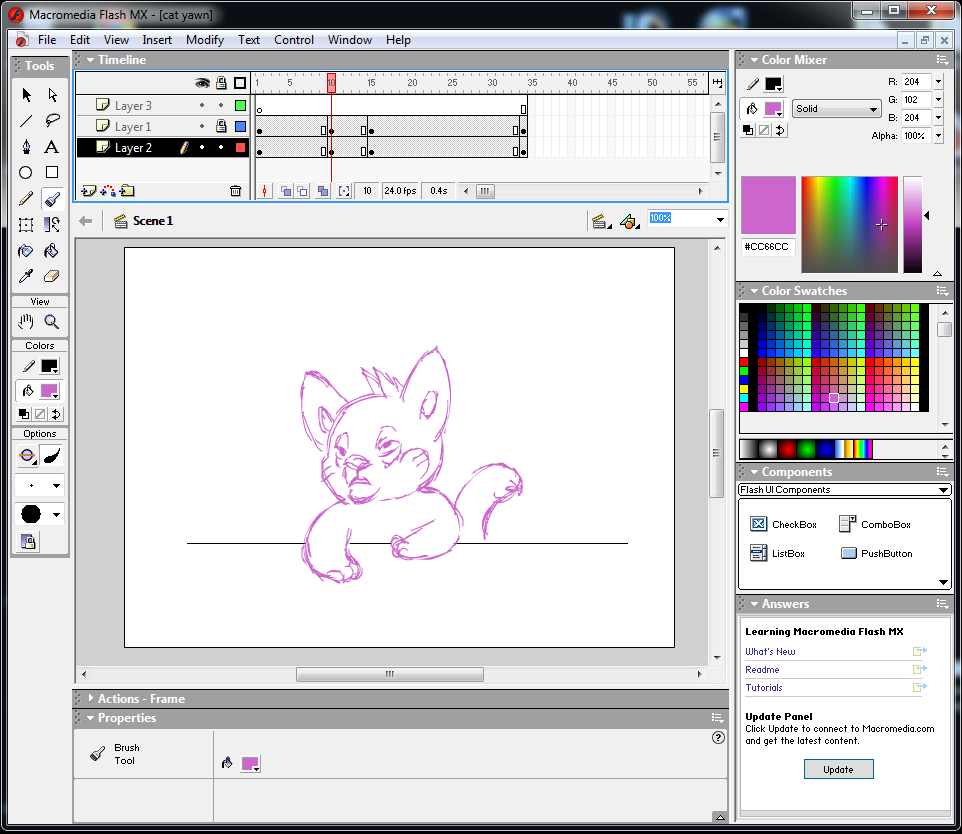
Now we can easily figure out where our keyframes go! Before the yawn can simply be placed on frame 1, the peak of the yawn on frame 15, and after the yawn on frame 34. Set up in Flash, the timeline looks something like this, with each black dot representing a keyframe (we are only looking at layer 1 right now, don't worry about the other layers):
Now that we have our keyframes set up, we need to draw the inbetweens, which are simply the drawings that fill in the blanks between the keyframes. The easiest way to do this is to pick the frame in the middle of your two keyframes and draw that one in, and continue to fill in the space in between your frames until you feel that they are close enough together for you to go through and fill in the rest of the blank frames.
Remember your timing and spacing, though! the frame that is exactly between two frames might not be the exact middle point of the motion taking place. Frame 8 is the frame directly in between your first two keyframes, but let's say that you wanted the yawn to start off slow and get a little faster as it reaches the peak. In this case you would want to put your middle frame a bit closer to your second keyframe. I chose to place mine on frame 10, as such:
Remember it is ok if some of your inbetween drawings aren't perfect, or look a little strange. They tend to look better in motion, and you can always go back and fix something if it really stands out and looks bad
So we go through with the process, deciding where to put the inbetweens based on our spacing, doing tests and fixing mistakes as we find them, and eventually we end up with a completed animation of the action
Once you are happy with it, you can go back and make a different layers over the animation to add cleaner lines and color, or just go over it with a darker pen/pencil if you are doing it on paper. But that is a whole different process that could be the basis of another tutorial, if anybody wants another one
How do I keep the character looking the same in each drawing?This can be very difficult. Keyframes help a lot, as does something called 'onion skin' in animation programs, which shows the faint outlines of your previous frames in the frame you are currently working on. When using pencil and paper, you get this same effect by using a 'lightbox,' or any lighted surface that lets you see the outlines of your previous drawings through the paper.
While these help a lot, there is a very important tool that helps you remember how your characters features line up, and what their proportions are. It is called a 'Character Sheet,' and I highly reccommend it.
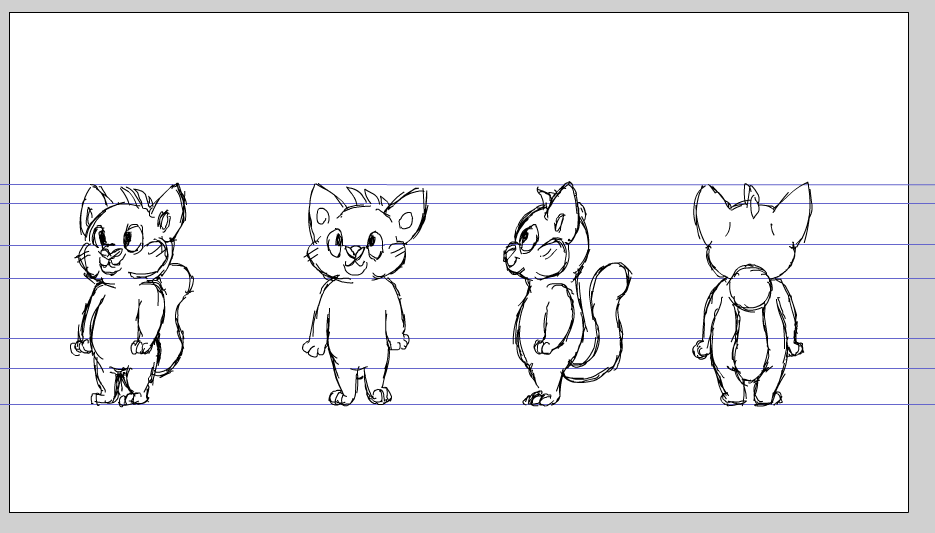
A character sheet is made by drawing a character in its basic standing position, and drawing horizontal lines accross the paper at each important point on the character. Common important points are the bottom of the feet, the top of the head, the shoulders, the knees, the waist, etc. Once you decide on these lines, you can use them to draw the character at a 3/4 view, side view, and back view, plust as many more rotations as you want. The end result looks something like this:
It's also a good idea to keep other reference drawings handy, such as poses of your character walking, jumping, or performing common actions, as well as drawings of common facial expressions.
This can be a huge help in keeping your character looking like the same character throughout your animations.
Conclusion.So, those are the basics! If there are any questions or anything I forgot to explain, let me know
")
Also, if anyone needs help with learning how to use pencil or any other animation program, or setting up a work station for traditional pencil and paper animation, I would be happy to help